How to Know If Cast Iron is Hot Enough: Tips and Techniques
Knowing when your

Table of Contents
When Is Cast Iron Hot Enough:
Hand Test:
- Over the Surface: Hover your hand a few inches over the skillet. If you feel the heat, it’s starting to get warm. Remember that the top of your hand, especially if it’s not calloused, is more sensitive to heat than the palm.
- Handle Touch: Touching the base of the handle with your thumb can also give you an idea of the skillet’s temperature. But be careful – it might be hotter than you expect.
- Touching the Sides: Some daredevils might try touching the skillet’s sides. However, there are better methods than this, which are not recommended due to the risk of burns. Remember, every part of a
cast iron skillet – from the handle to the pour spout – heats up. - Palm Heat Gradient: Position your palm open and flat, facing downwards towards the skillet without making direct contact. Slowly move it closer to the skillet’s surface. The rate at which you start feeling the warmth gives you a gradient idea of its intensity. A rapid sensation indicates high heat, while a gradual one suggests a milder temperature.
- Back-of-the-Fingers Test: Another technique involves gently bringing the back of the hand and fingers close to the skillet’s rim. This method capitalizes on the thin skin and sensitivity in this area. While it provides a quick gauge of heat, ensure you don’t touch the skillet directly to avoid burns.
- Using the hand test methods requires experience and intuition. Over time, as you become familiar with your
cast iron skillet and its heating patterns, you’ll be able to judge its readiness with more confidence. However, always prioritize safety and avoid direct contact to prevent potential burns.
Water Test:
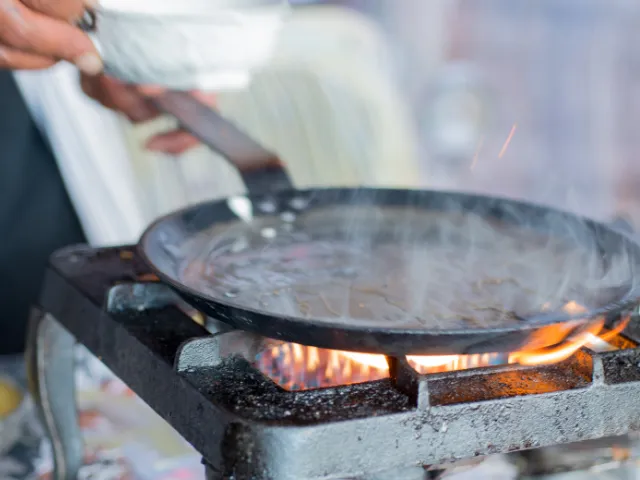
A quick and easy way to check the skillet’s heat is by sprinkling a few water droplets onto its surface. If the water sizzles and dances around, that indicates that the skillet is almost ready for cooking.
- Steam Emission: Observe the steam coming off the water droplets. Rapid and dense steam indicates a very hot skillet suitable for searing or high-heat cooking. On the other hand, a light wisp of steam suggests that the skillet is warm but perhaps still needs to be at its desired temperature for certain dishes.
- Water Bead Lifespan: The water droplets’ duration before evaporating can also be a good indicator. Instant evaporation suggests a high heat, making the skillet ready for tasks like searing meat. Suppose the water beads take a few seconds before disappearing. In that case, the skillet might be at medium heat, perfect for sautéing or frying.
Utilizing the water test not only gives you a visual cue but also an auditory one. The sound of sizzling water can act as a reliable alert to let you know your skillet’s temperature status. Pair this test with other methods for best results and greater cooking precision.
Oil Shine:
A well-seasoned
- Oil Movement: Pay attention to how the oil moves across the skillet’s surface. As the skillet heats, the oil becomes more fluid, flowing more freely and easily spreading. If the oil flows quickly with a slight tilt of the skillet, it’s a sign that it is nearing the right temperature. On the other hand, if the oil moves sluggishly or remains stationary, it may need more time to heat.
- Oil Smoke Point: Any oil you choose will have a different smoke point: the temperature at which they start to smoke. If you notice a light wisp of smoke from the oil, it indicates that the skillet has reached its smoke point. This can be a good benchmark, especially if you’re familiar with the oil you’re using. For instance, if you’re using extra virgin olive oil with a smoke point of around 320°F (160°C), the appearance of smoke tells you the skillet has reached at least that temperature.
Monitoring the oil’s behavior is an ancient yet effective way to gauge your skillet’s temperature. While the smoke point can provide a clear sign of high heat, always ensure proper ventilation in your kitchen to avoid inhaling any fumes and ensure safety while cooking.
Infrared Thermometer:
An infrared thermometer offers a more exact measure for those who like precision. Aim into the skillet, point, and shoot for an accurate temperature reading. For instance, the center might read around 182 to 185 degrees, while the sides, where heat radiates outward, might show about 132 degrees.
- Comparison Points: Using the infrared thermometer at different spots can give you an overview of the skillet’s heat distribution. For instance, measuring the temperature near the edges versus the center can tell if the skillet is heating uniformly. Non-uniform heat distribution could suggest that adjustments might be needed in your heating source or that the skillet hasn’t been on the burner long enough.
- Repeated Measurements: Taking successive measurements at regular intervals can provide insight into how quickly the skillet is heating up. If you notice a rapid increase in temperature within a short span, it might indicate a very high flame or heat source. On the other hand, a gradual increase can suggest moderate or low heat, allowing you to adjust accordingly based on your cooking needs.
Using an infrared thermometer can take the guesswork out of determining skillet readiness. It provides objective and accurate readings, ensuring that your dishes are cooked at the optimal temperature. This tool can be especially beneficial for those new to using cast iron skillets or when precision is crucial for a specific dish.
In Conclusion:
There are multiple ways to check if your
I absolutely love cast iron! One of the things I appreciate the most about it is how it spreads heat evenly and retains it so well. In fact, its superb heat retention qualities are one of the many reasons why it’s such an amazing material. However, its heat retention also means it can remain hot long after being removed from the burner. Always approach cautiously, even when you think it might have cooled down. The longevity and performance of a
Key Takeaways:
- Hand Test: It is a quick and intuitive way to gauge heat but requires some experience to master.
- Water Test: Visual and auditory cues help determine readiness; dancing droplets and sizzling sounds indicate heat.
- Oil Shine: A seasoned skillet’s oil shimmer can show when it’s heating up, with the movement and smoke point offering additional insights.
- Infrared Thermometer: This tool provides accurate and objective temperature readings for those seeking precision.
- Safety First: Always approach the skillet cautiously to avoid burns, given its ability to retain heat for prolonged periods.


Wonderful tips! My induction cooktop has made judging heat by the dual number inaccurate. One dial has low to 6, then high. Another dual has low to 8, then high. Growing up with an electric stove, has made induction cooking a challenge. I appreciate the water and back of the hand tips. Thank you!